Ubuntu is one of popular Linux Operating Systems. It's based on Debian. There are many Ubuntu official flavours you can choose, even dozens of Linux Distribution are build base on it. To narrow it, this tutorial will guide you how to install Ubuntu in general because whatever flavour you have chosen, the installation process is same.
Ubuntu Installation Guide:
1. Download Ubuntu
You first need to download a Ubuntu .ISO CD image file from here. In this example we install Ubuntu version 15.10. But it does not matter what version you use.
From Ubuntu download page, i personally recommend you to choose alternative download using torrent client since the file is larger than 1 GB so if ,in case, there is some interruption you can resume your download.
It is also important for you to choose the right version of Ubuntu. Choose Desktop instead of Server version to get full graphical desktop experience. Again, if your Computer is newer version and has memory larger than 2 GB, choose 64-bit version. If your computer memory less than 2 GB choose 32-bits version.
2. Burn Ubuntu .iso File to DVD disc or Create Bootable Pendrive
After you download .iso file, now it’s time for you to decide what media you want to use to install Ubuntu. If you have DVD disc and want to keep it for another installation or want to distribute it to your friends, then burn it to DVD disc. If you want a better speed of installation or your machine doesn’t support CD/DVD, then create a bootable USB pendrive (i recommend this).
To create bootable USB drive download rufus and run from your windows machine.
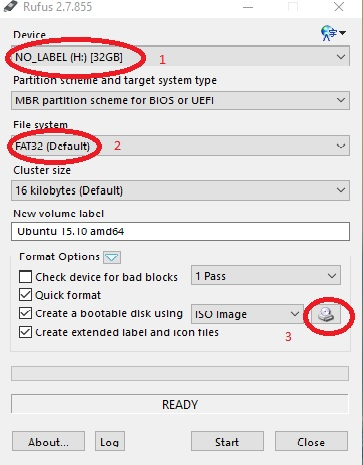
- On rufus choose pendrive you want to use (1)
- Choose File system: choose FAT32 (2)
- Click on disc icon and direct it to .iso file you have downloaded (3)
- Hit Start button, wait until process is finished.
3. Boot Your Installation Disc Or Bootable Usb Pendrive
After previous process is finished, reboot your system. Usually, our BIOS will have the option to press a key on startup and open a boot menu. It could be any of F1-F12 key or even Delete key depends on your machine manufacturer). From this menu, we can select our DVD or USB to install Ubuntu (depends on what media you decide to use).

4. Install Ubuntu
Once you get the working bootable USB or CD follow the screens below to install Ubuntu:

Choose your Language and click install Ubuntu

On picture above you have options to download updates while installing and install third party software. I personally recommend you to uncheck all those options to save installation time and do it later after installation is finished. (Some experts recommend to check those option, but it will add extra hours depend on your internet connection).
Click continue.

If you prefer to install Ubuntu only, select Erase disk and install Ubuntu. This option will erase your previous windows installation and automatically create partitions to your machine , it is the easiest way.
If you already has Windows on your system and want to keep it then choose Install Ubuntu alongside Windows. This option will automatically create partitions for Ubuntu. On some systems, however, this option might not be available, or there might lead to some problems with the installation.

Another option is “something else” this is safest option but tricky. It will allow you to create your own partition and choose what partition you want to install Ubuntu which is pretty complicated for beginner but don't worry we will cover on this guide.
This option is usefull if you want to run more than one operating system on your machine.

On the next screen of "Something else", we will see the Windows' NTFS partitions. To install Ubuntu, first thing to do is free some space.


To free some space, select larger ntfs partition (not the loader). Click change button. Reduce windows partition to 60% of its size. In this example 40 GB will be enough to install Ubuntu.

Now your partition table should like picture above. Next step, create partitions. In this guide we are creating two partitions for Ubuntu. One for swap area and other for /root partition. To create swap partition, select Free Space and then click Plus (+) button.


Next step, create root partition. After creating swap partition, select the rest of Free Space and again hit plus (+) button. If you all set. Click OK. It will prompt you to continue or back. Hit continue.

Select your region. Click Continue.

Choose your keyboard language and layout.

Now fill the blanks with your information to create a username, password, and computer name. You will login with this userid after the installation is complete.

After all steps above, the rest of the installation proceeds without requiring any other input.

Now, installation is complete. Restart your computer.

Now, everytime you boot your computer, the grub menu above will appear and you can choose what operating system you want to boot.
Congratulation You’re Done.


Why not create a new partition on the drive in Windows and install Ubuntu there using the erase disk feature, or is this not possible with Ububtu? It works OK with Debian and Fedora.
ReplyDeleteubuntu indirmek için tıklayın: ubuntu indir
ReplyDelete